
I wanted to know how far Roomie's coding agent can actually go on real engineering work, not on a to-do app. So I gave it one long job in a single chat on my Mac: start from an empty folder, design a drone flight controller board, build the drone around it, then keep pushing it with harder requirements. I was away for most of it and told it to make its own choices and tell me what it decided.
This post is a record of that run. All the numbers below come from the agent's own reports and the files it left in the folder. Nothing here has been built or flown in the real world. It is a desk study, and I'll point out where the agent itself said a result was unproven.
Step 1: A flight controller board
The first ask was a flight controller around an STM32F405 with a gyro, a barometer and a 433 MHz receiver, drawn as a wired KiCad schematic, checked, laid out as a PCB and routed.
The agent used our electronics kit's template, drew the schematic and ran KiCad's own electrical rule check: 0 errors, 0 warnings, and the netlist matched the design pin for pin on all 29 nets. It also simulated the analog filters and the roll rate loop (phase margin 57.4°, gain margin 11.6 dB) and checked the clock harmonics against the radio channel. Then it placed and routed the board: 101 of 101 connections routed, with KiCad's status bar showing Unrouted 0.
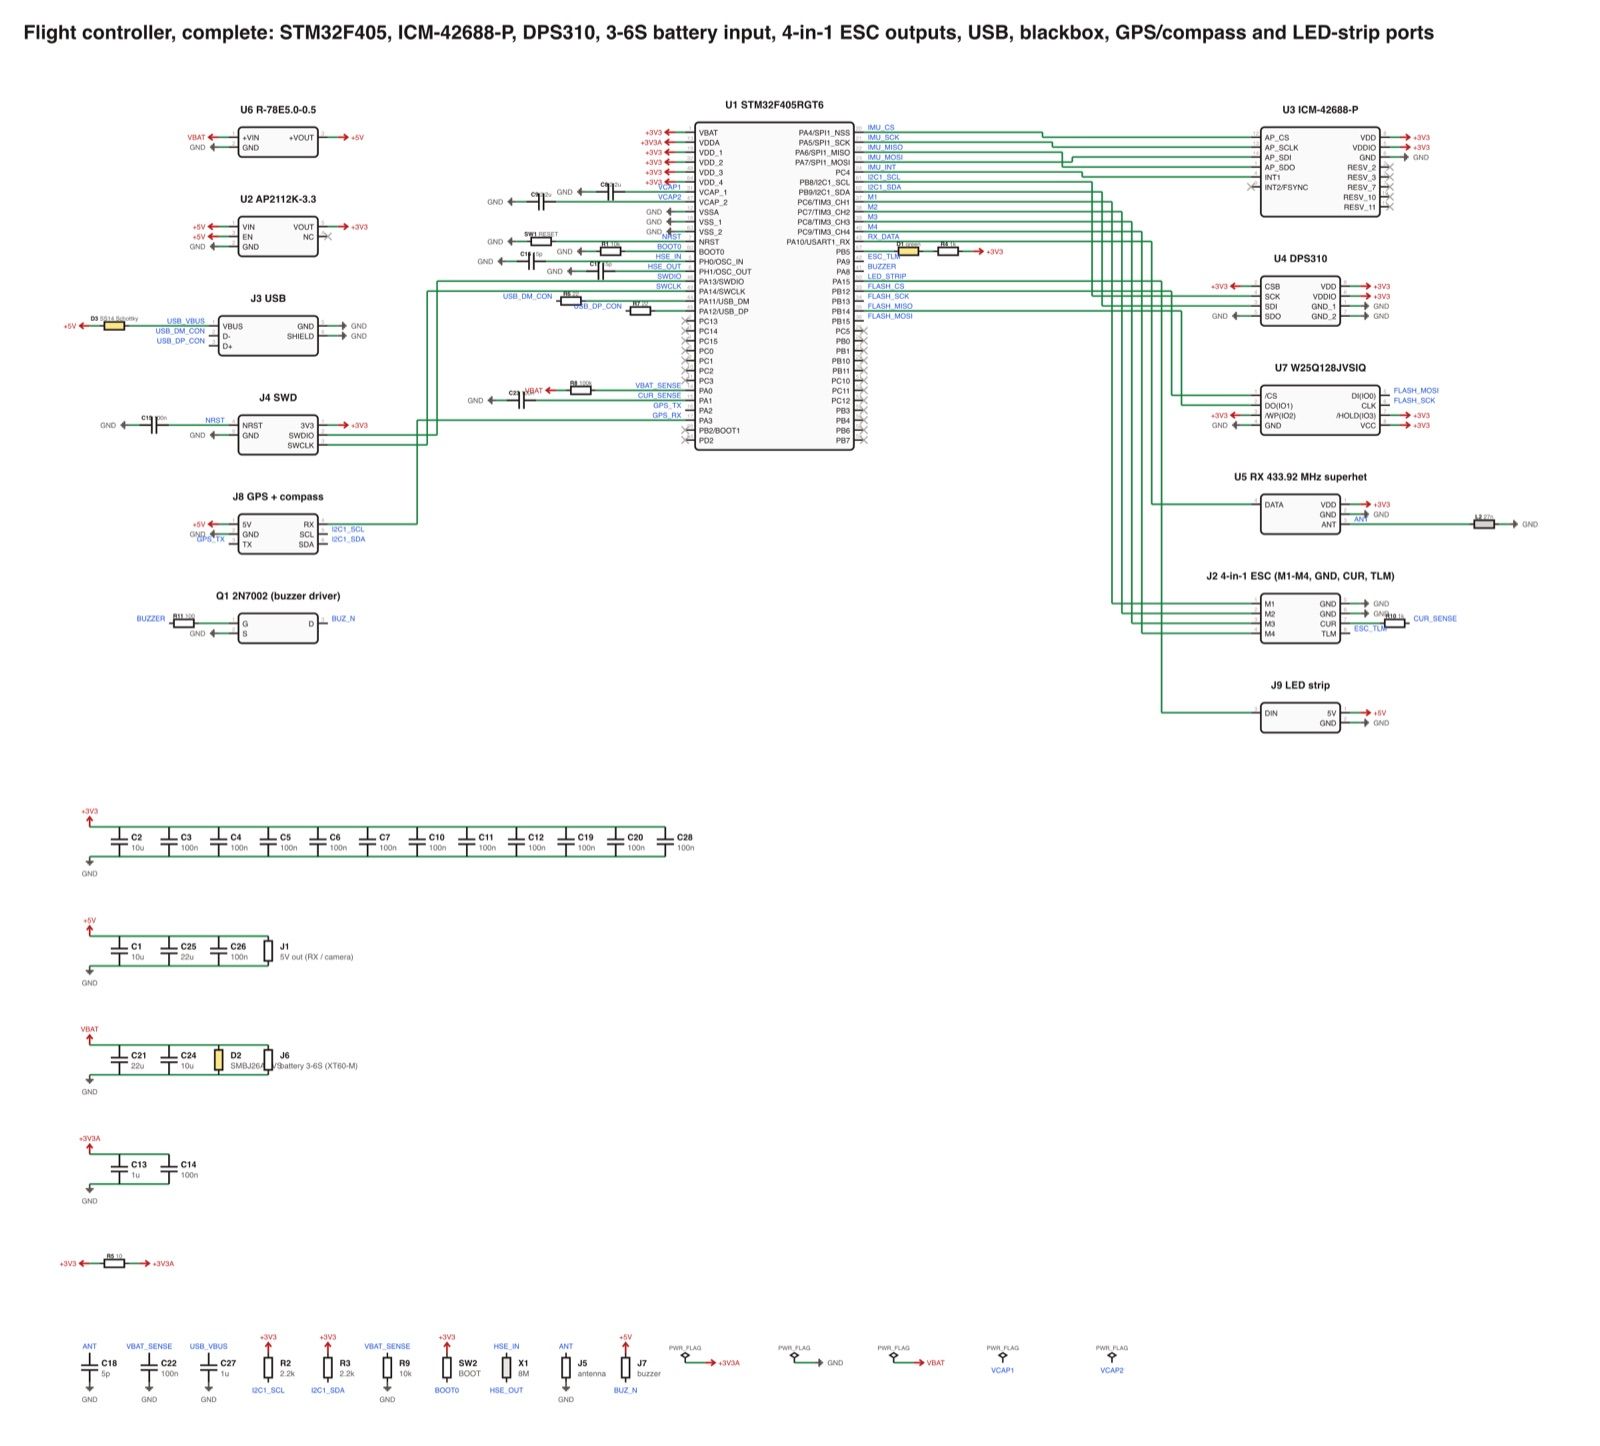
What I liked is that it did not stop at "done". It listed what was still mine to review: three chips whose pin numbers came from datasheets only because KiCad had no symbol for them, no impedance control or length matching, and silkscreen warnings left for layout.
Step 2: Make it a complete quadcopter board
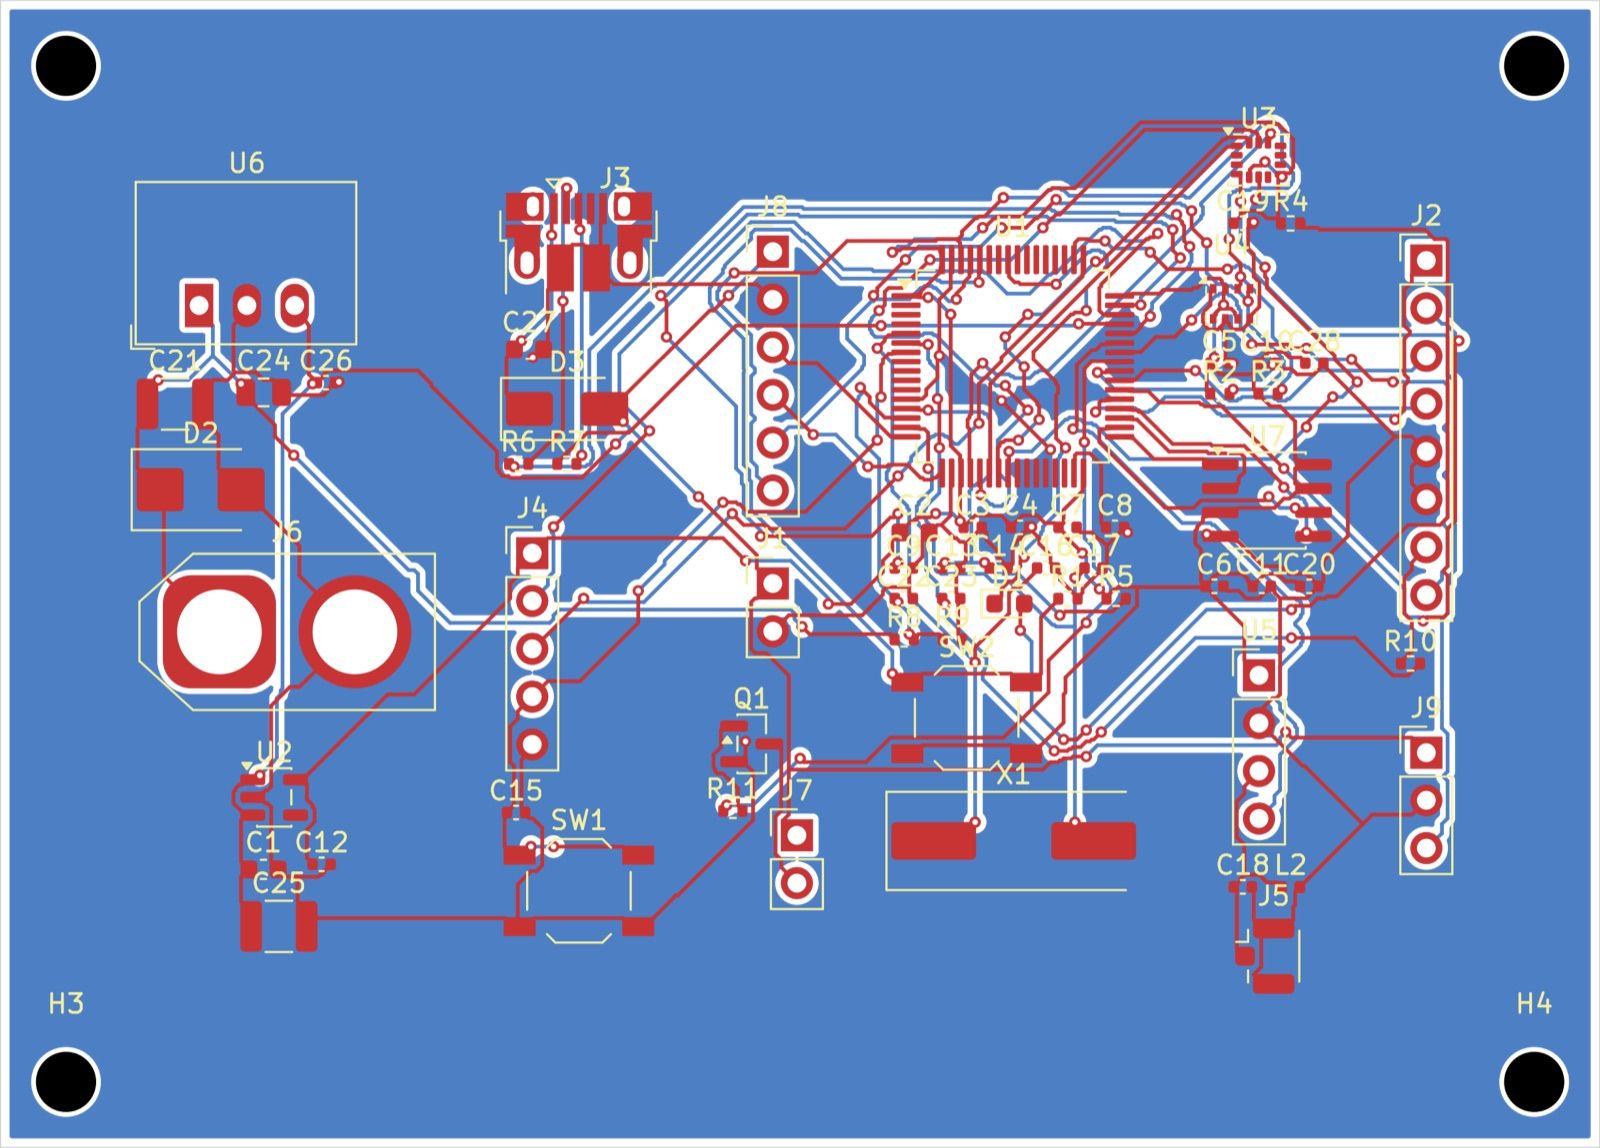
A flight controller alone can't fly a drone, so I asked it to add whatever was missing. It added battery input for 3 to 6S with a TVS clamp, a 5 V switching regulator, an 8-pin 4-in-1 ESC connector, USB power, reset and boot buttons, a buzzer, blackbox flash, and GPS and LED ports. It explained each choice. For example, it picked a fixed 5 V module over a discrete buck chip because it could not open the buck chip's datasheet and did not want pin numbers from memory.
The first routing pass left 4 of 167 connections unrouted, and it reported that number instead of hiding it. After we updated the kit, it re-ran with a real XT60 battery footprint and M3 mounting holes, and got to 167 of 167 routed. The finished board: 85 x 61 mm, 63 parts, 47 nets, a back-side ground pour covering 77% of the board.
Step 3: A 5 inch drone around the board, in Blender
Next I asked it to design the drone that carries this board in Blender, sized from real numbers. It exported the board's 3D model from the kit and built a 5 inch X quad around it, with the board on its own M3 holes.
It worked out the sizing first: about 460 g all-up weight, thrust-to-weight around 12, and roughly 20 minutes of hover on paper. It immediately said to expect 60 to 70% of that in the air, because the model leaves out wiring, screws and the video transmitter. The Blender model was then checked against those numbers: prop tip gaps, blade clearance, battery clearance. All ten checks passed.
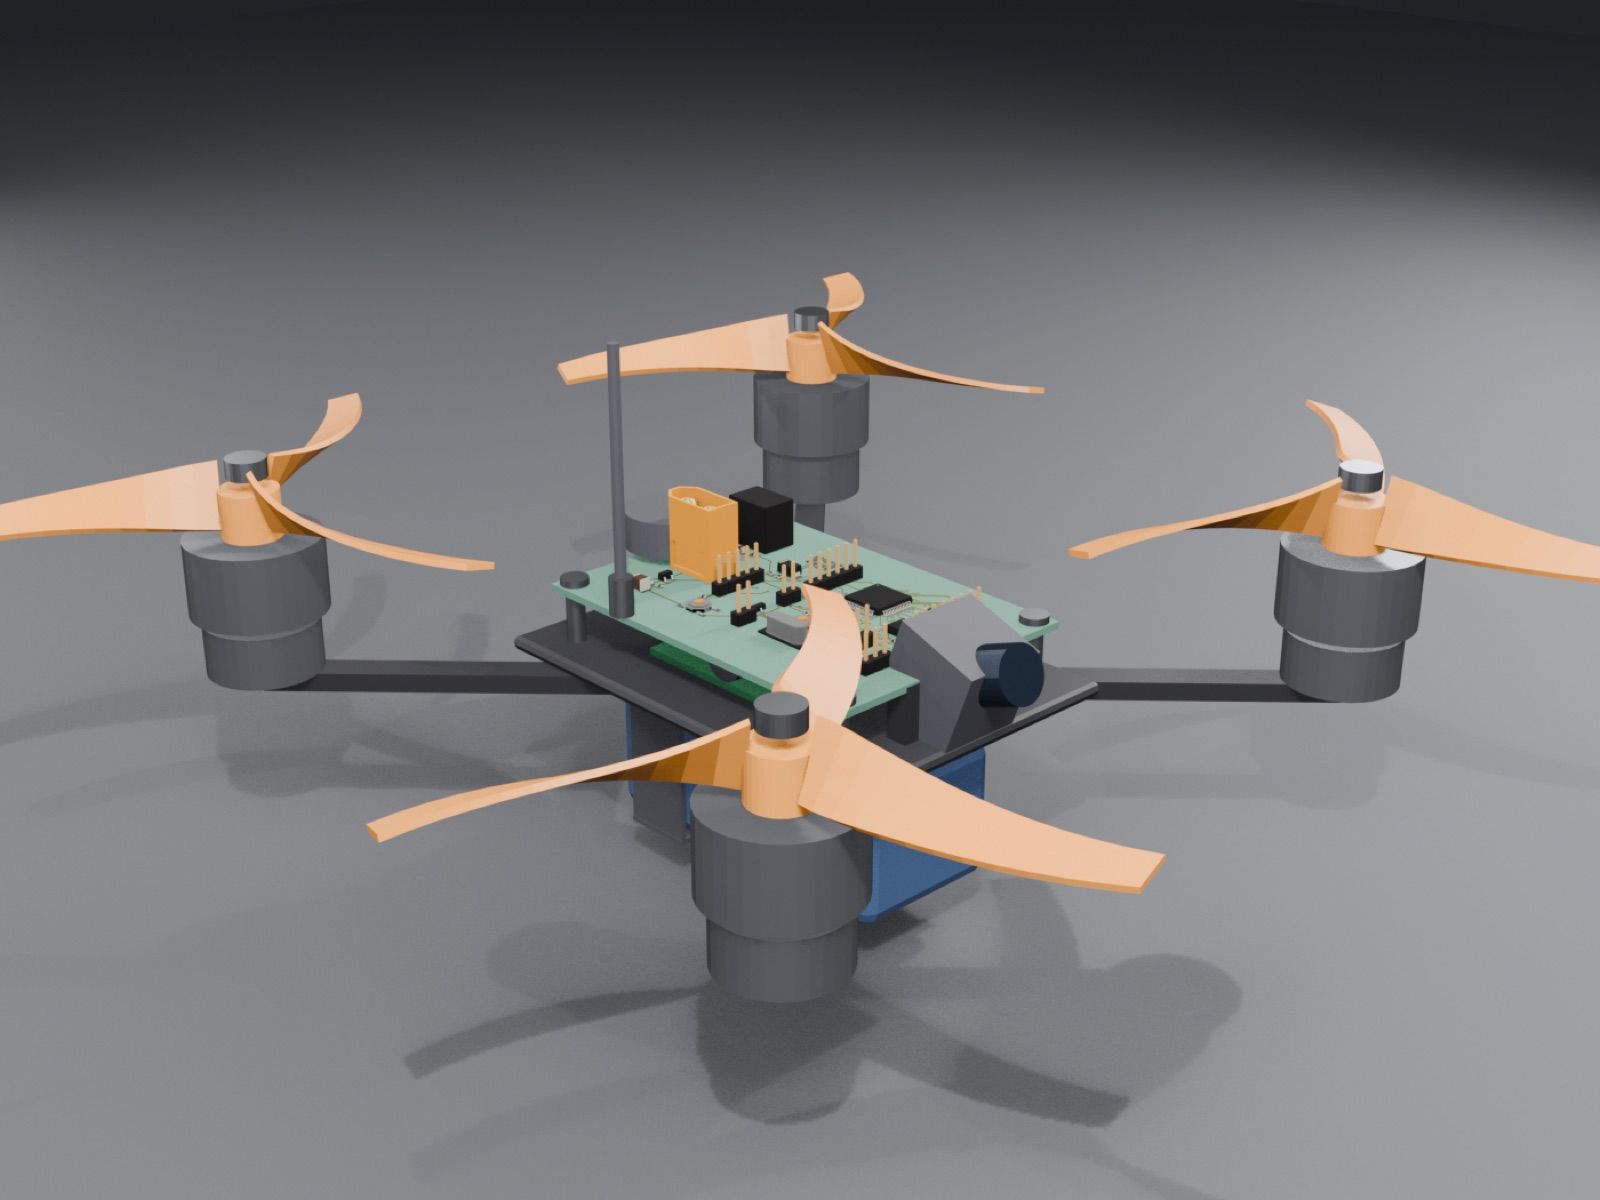
On its own, it moved the clearance maths out of the Blender script into a plain Python module and wrote 26 unit tests for it, including boundary and failure cases.
Step 4: Carry 10 kg for 15 minutes
Then I made it hard: carry up to 10 kg of payload for 15 minutes on a lithium-ion pack of cylindrical cells, with the battery weight worked out by the agent.
Its first answer was a plain one: yes, it's possible, but it becomes a roughly 32 kg cargo drone, not a bigger version of the 5 inch quad. It designed an octocopter with 30 inch props, a 12S7P pack of 84 Molicel P45B 21700 cells (about 1.36 kWh, 7.3 kg), and simulated the 15 minute mission second by second, with battery voltage and charge draining over time. On its model it lands with 35% charge, or 26% with pessimistic propeller and motor numbers. It chose 7P over 6P because 6P failed that pessimistic case.
It also checked whether our flight controller board still suits a 12S pack, and said no. The input protection, capacitors and 5 V regulator are rated for 25 to 28 V, the voltage divider would push the ADC past 3.3 V, and an octocopter needs eight motor outputs, not four. It listed what must change for each.
Step 5: A closed-loop flight simulation
I asked it to fly the heavy drone in simulation. It wrote a 6-DOF closed-loop simulator with a rotor model, controller, mixer and gusty wind (5 m/s mean, 8 m/s gusts), and flew a mission: climb, 1 km out, hover, 1 km back, land.
Against the pass bar I set, it passed. No motor saturation (peak throttle 74%), largest attitude error 1.54° against a 5° limit, and it landed with 42.75% charge. Along the way it found and fixed three mistakes in its own first model, including an inertia it had calculated about six times too high. It then built a small web page that replays the recorded flight with gauges and charts, and wrote tests for that too.
Step 6: CFD on the propeller, and an honest failure
Finally I asked for velocity vectors, a pressure contour, how it meshed, and a mesh dependence study. It set up an OpenFOAM case for the propeller blade section at 70% radius, matching the Reynolds number of the real blade in hover.
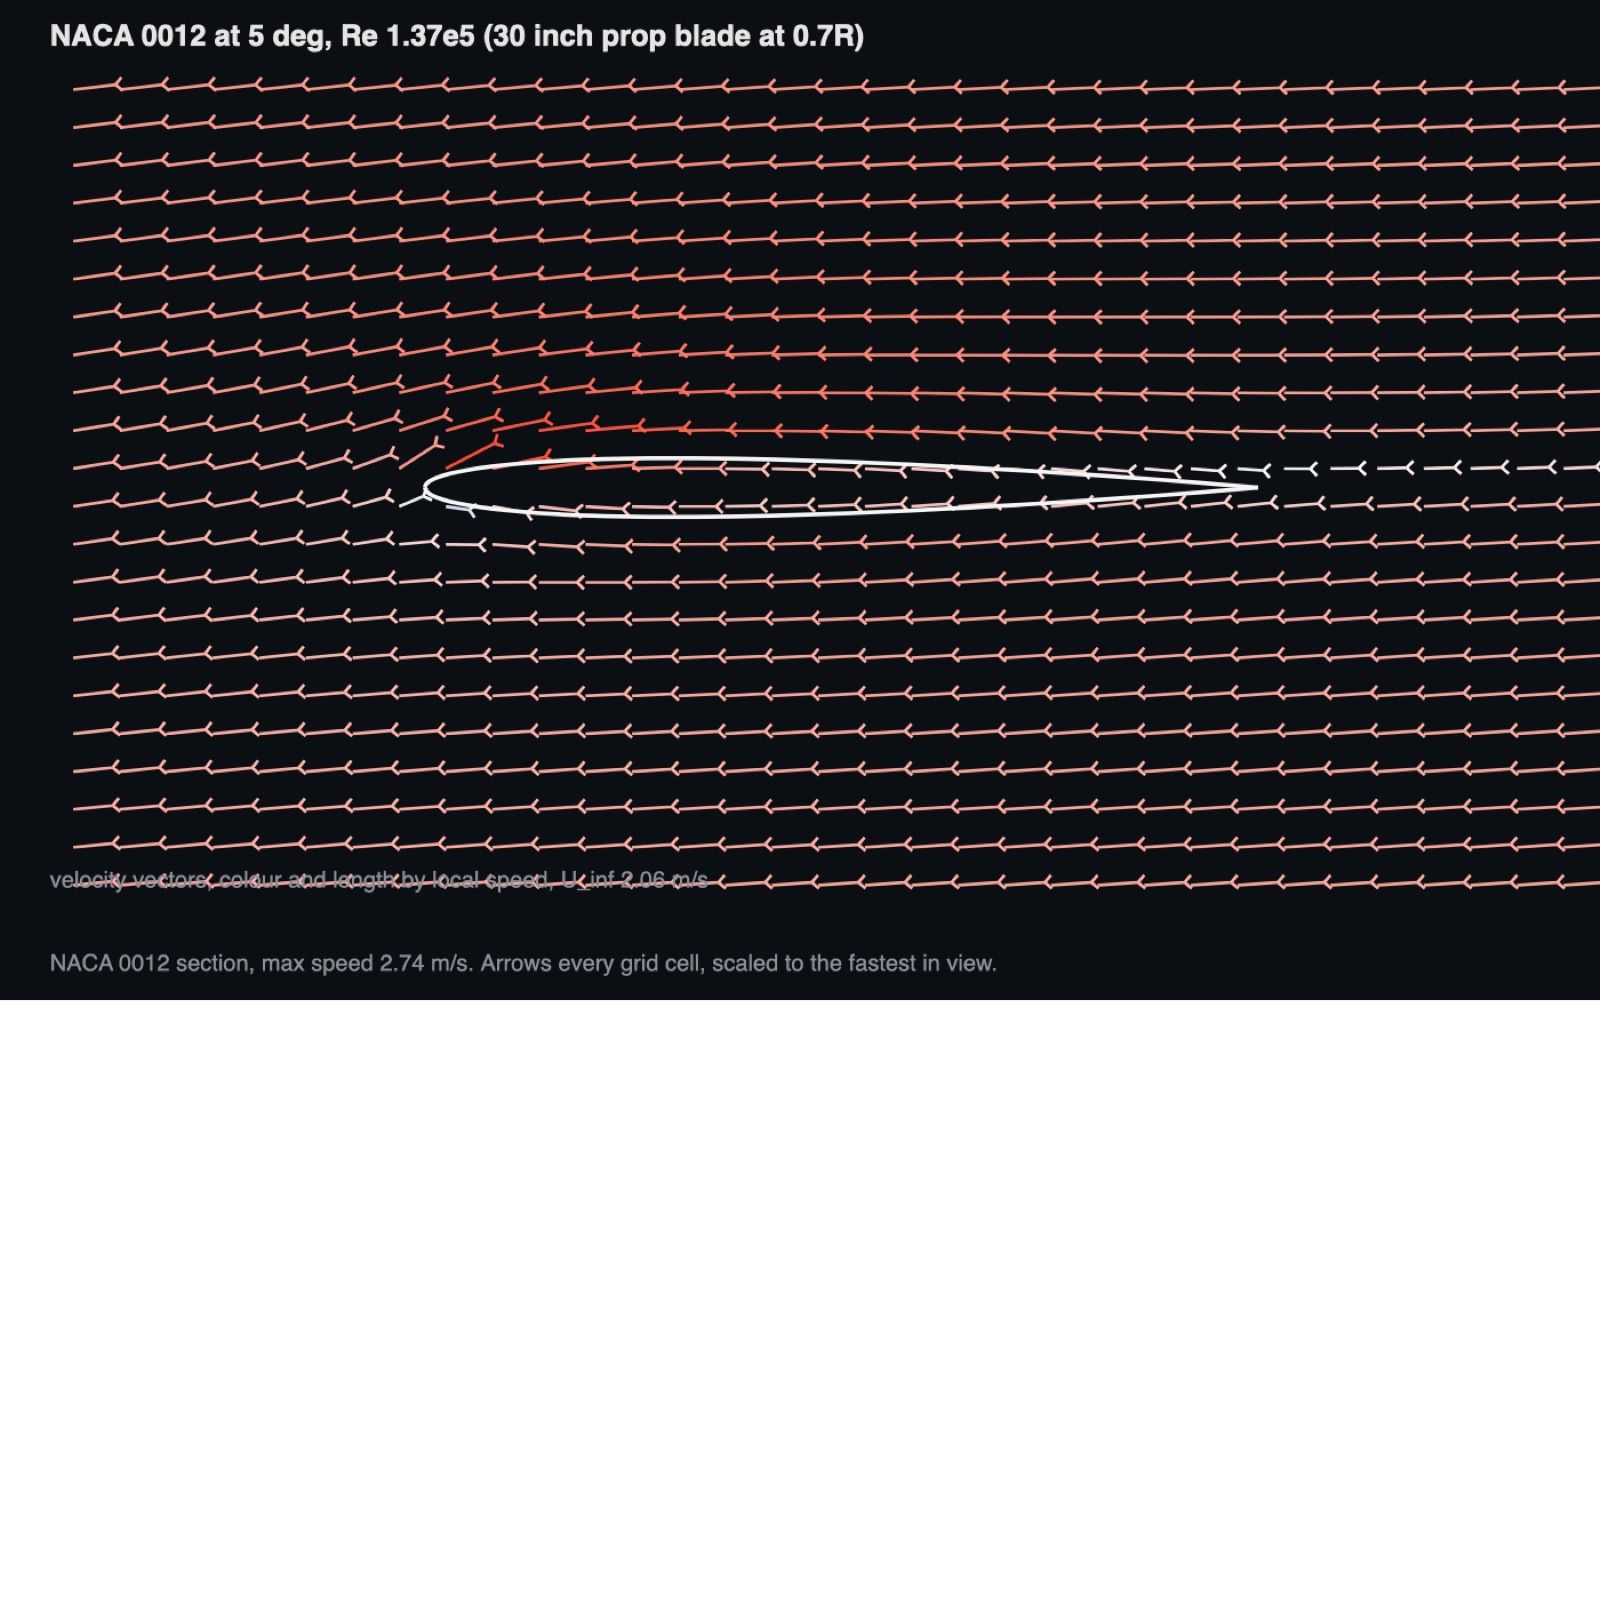
The mesh study at three densities showed lift converged within 0.3%. Drag was not converged, and it said to quote drag as a band of about ±20%.
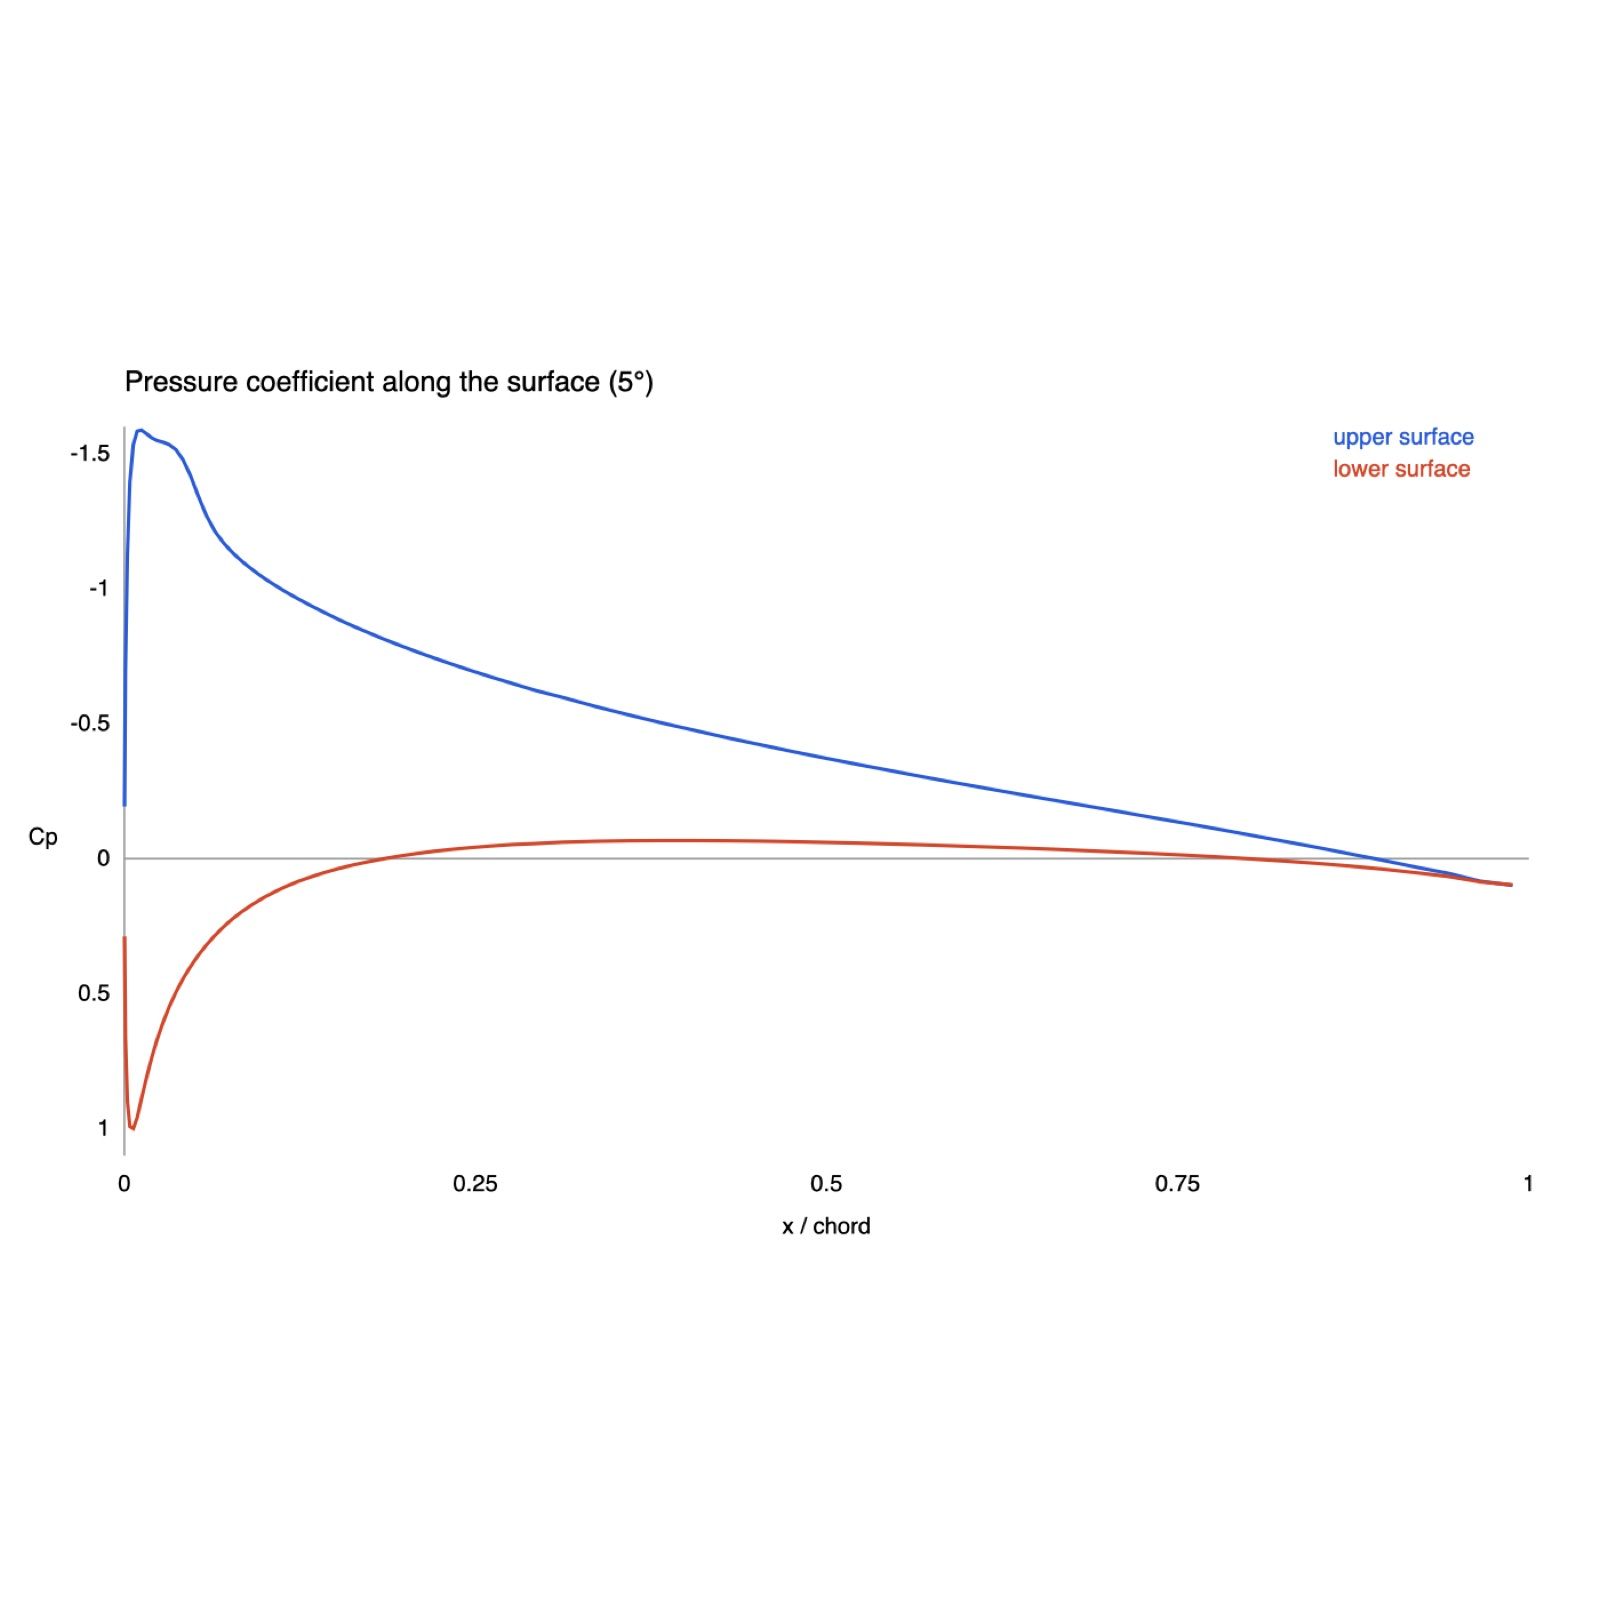
This is the part that mattered most to me. The CFD kit's verify step ended in VERIFY FAIL 2: the pressure residual didn't get under the limit, and lift was 11.1% below thin-airfoil theory against a 10% limit. Its first reply explained the lift gap but didn't clearly say that verify had failed. I pushed back, and it said so plainly. It then found the actual cause of the residual problem (solver settings inherited from the OpenFOAM tutorial, not the iteration count) and fixed it without loosening the limit. The rerun gave VERIFY FAIL 1. It kept the lift row as a failed check, gave its reason (a fully turbulent model at this Reynolds number), and offered the honest ways to clear it rather than claiming a pass.
What I learned
- It went much further than I expected. One chat took an empty folder to a routed board, two drone models, a mission simulation, a 6-DOF flight sim and a CFD case, with over 100 unit tests across the project.
- The checks matter more than the output. Every step ended with a tool's own verdict (KiCad ERC, the kit's verify, unit tests), not just the agent's word.
- It needs a human who reads the results. The one time it softened a failure, it was because I hadn't asked plainly. Once I did, it reported the failure straight. That's why Roomie shows the steps, proofs and decisions next to the chat: you can see what was checked, not just what was claimed.
- It is a first pass, not a product. Pin numbers still need datasheet checks, the flight model is momentum theory, and nothing here has flown. The agent said all of this itself.
If you want to try the coding agent on your own work, it runs in the Roomie desktop app. You can read more on the coding agent page or download the app.


